- 1. Download and drag to your Applications folder to install.
- 2. Launch Autograph. You will see a black A on the toolbar in the upper right-hand corner or your screen. Autograph will run in the background while you go about your business elsewhere on your laptop.
- 3. When you're ready to sign, click on the A, or use the hotkey (the default setting is Ctrl+Cmd+A) to open the signature window. Sign with your finger or Pogo Sketch on your trackpad.
- 4. If satisfied with your signature, hit enter to accept or escape to clear the window and sign again. Your signature will be inserted immediately into the document you are working on.
- 5. Remember you can always three-finger-swipe left or right to undo/redo. It's also fun to hold down spacebar. This will let you position your pen without inking.
- Registering Autograph
- General Preferences
- Stroke Preferences
- Export Preferences
- Autograph Help Index
How can I sign a .pdf document using Autograph?
- Export the pdf into .tiff format. Open it, fire up Autograph, and drop in a signature. It usually shows up in the bottom left corner of the page. Be careful where you place it because preview does not allow editing later. You can now export the document page back into .pdf format. Note the document will now be a raster format and no longer searchable, similar to if you had printed and scanned it.
- Drag in the signature page of your PDF into a new Word document. Then, fire up Autograph to drop in a signature. Be sure to change the image wrapping to "in front of text" in Word after your signature appears. Then you can position it correctly.
- In Autograph, go to preferences and check save to desktop and select PNG format.
In the PDF in Acrobat, select the TouchUp Object Tool (Tools - Advanced Editing), right click on a blank space, and select "Place Image."
Navigate to desktop, choose PNG as type of image, choose your image, "autograph.png."
- PDFPen just works. It's an intuitive experience, with no surprises. Highly recommended. For multipage PDFs, click on the page where you want the signature in the main view before launching Autograph.
How can I integrate with FileMaker for a paperless office?
You'll need a button to trigger the Autograph window, and a container field to hold the autograph.png file. Make sure to configure Autograph to save an autograph.png file to your deskotop.
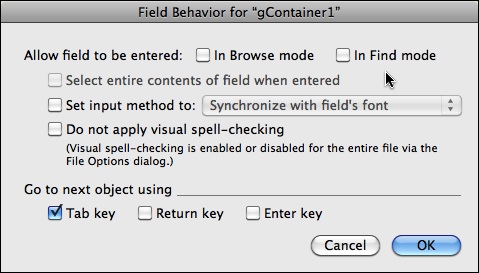
1. Create the Container field on the layout (here I named it gContainer1 and its a global container for my purposes, but you can use whatever you wish). The behavior for that container field should have 'Allow field to be entered:' with 'In Browse mode' unchecked.

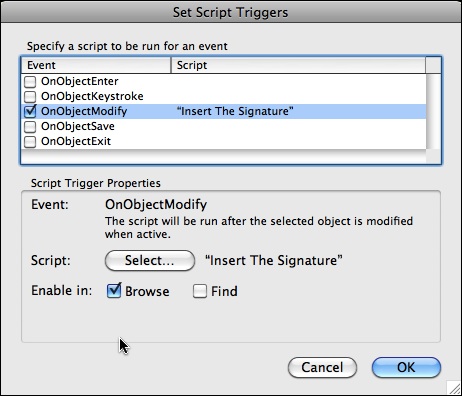
2. Create a trigger script which I call 'Insert The Signature' with the following script steps.
Set Variable[$path ; Value:"imagemac:" & Get ( DesktopPath ) & "autograph.png"]
Insert Picture["$path"]
Commit Records/Request [No Dialog]
3. Set the script trigger for the Container field to 'OnObjectModify' as shown here.

4. Create a button to trigger Autograph.
The FileMaker script is as follows (the actual name of the container field depends on your database of course).
Go to Field[Patients::gContainer1]
Perform AppleScript["tell application "System Events"
key code 0 using {control down, option down}
end tell"]
Now, in browse mode, click on the button, the Autograph window comes up and the container field is entered. When you sign then hit the Enter key, the container field is modified and then picks up the autograph.png file and the correct background is then there.
If you run into any trouble, try downloading this example database with the integration all set up: AutographFMDemo.fp7.zip
A big thank you to Ron Smith MD for these integration instructions.
How can I insert a signature into GMail web interface?
Fully Compatible Programs
Why isn't Autograph working?
Any Suggestions for MS Word?
Will the signature stand up in court?
For legal purposes, we recommend using a digital asymmetrical key encryption system to generate a hash result that will guarantee the document has not been altered. This should satisfy nearly any legal requirement.
For more information, please see: http://www.abanet.org/scitech/ec/isc/dsg-tutorial.html